Things To Look For When Buying An RV pt II

Life in a modern RV depends upon electricity, whether it be shore power or internal power delivered by its batteries. Some trailers have one or two batteries, while motor homes will have several, often two separate RV battery systems. One provides an electrical source for the chassis that is used to start the motor and functions as it would in any conventional vehicle. The other set of batteries power the house and its lighting and appliances.
So the RV battery compartment and its contents are a critical area in the deciding factor when purchasing an RV, new or used! Many who purchase an RV do so for their needs for the moment. They don’t see beyond that first trip, first weekend or season. It doesn’t take long whether you are a weekender or a full timer to realize that you’re rig has some short comings when it comes to electrical capacity. This becomes really evident of you boondock or dry camp for any length of time. Yes, it does take a while to learn how to conserve electrical consumption when your so used to flipping on a switch after living in a conventional house. More about expanding that capability later.
 Right now lets focus on the battery compartment and its contents. Besides the batteries I keep: 1) Jug of distilled water (for refilling the batteries); 2) Battery Hydrometer (to check condition); 3) Compact Jumper Battery (to jump start the towed if necessary or use as a 12v power source when testing equipment); 4) Charger for portable jump battery; 5) Flashlight.
When inspecting an RV for the first time, look for frayed or loose cables, corrosion on the batteries themselves or anywhere in the compartment. If you find white powdery residue on the walls or top of the compartment, its a good indication that a battery exploded due to overheating/overcharging or the previous owner drive a considerable distance without replacing the filler caps on the batteries. Battery acid is a corrosive, so make sure this residue is cleaned and neutralized.
Visually inspect the water levels in each battery to make sure they are at the proper level. Test the condition of the batteries with a battery hydrometer. Maintenance free batteries will often have an indicator as to their condition. Check the date code to see when the batteries were put into service. Batteries 5 years or older should be replaced…or at least be prepared for the expense of replacing them.
 Any corrosion evident should be checked for its cause. Sometimes its left over from battery neglect, dissimilar metals reacting with the acid vapors in the compartment or a leak. Often a hasty change of batteries won’t include a proper cleaning of the compartment prior to installing the new batteries. Ask that they be removed and the compartment properly cleaned and the new batteries reinstalled.
 RVs bounce! You’ll soon discover that its contents bounce around inside when it does! Make sure the batteries are secured firmly in the compartment using the proper devices. The service tech that installed these batteries was missing the latching mechanism so an improvised method was used…WRONG! It takes just one good bounce to cause the batteries to shift location and possibly crack their casing…causing a major leak, mess, power failure and possible FIRE! Secure those batteries properly!
Follow the cables to their ends, make sure all connections are tight, the cables are rubbing against anything that will cause the insulation to be worn through causing a short…again a short can cause fires.
While we’re checking, look at the adjacent compartments where the cables and wiring run to/thru. Check to make sure nothing interferes, pinches or binds them. Check connections on such things as the inverter, converters and distribution panels. Make sure the compartments are clean and free of dust, dirt and debris. You don’t want anything metallic that could bounce and potentially lay across the connections, terminals and posts that could cause a short…discharge…or fire.
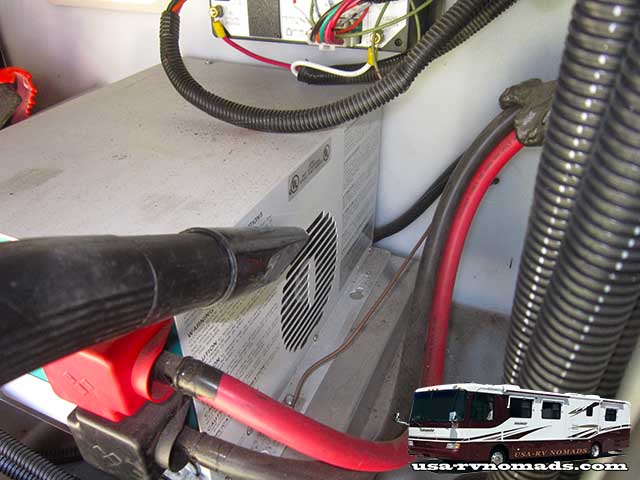 To keep your batteries at peek performance, check them monthly…weekly if you’re boondocking and frequently recharging them. Keep your inverter happy…keep it clean, especially the cooling fan clean and working efficiently. A dirty fan will cause the inverter to overheat and fail prematurely. Again keep the compartment clean! Vacuum as needed, especially if you spend any time traveling on gravel roads…dust finds its way into every corner of an RV.
More Things to Look For When Buying an RV
Part IV – Inspecting Your RV Structure
Part III – Caring for Your RV Generator
Part I – The Pre-purchase RV Inspection