DIY RV Toilet Repair: Replacing the Vacuum Breaker

Not all problems lead to disasters…unless you let them go unattended! The longer you are an RVer the more you learn…this was true for us with our RV toilet repair. Recently we started to notice some condensation on the floor behind our toilet. This soon became drops, which evolved into a small puddle. At first, we thought it was just condensation forming on the water supply line. But further inspection revealed it was a leak coming from a contraption affixed to the back of the toilet, the vacuum breaker.
I used a mirror and flashlight to look behind the toilet to see if I could spot the source of the water. It was much easier to use the mirror/flashlight combo than pulling the toilet. I watched closely as I worked the toilet flush pedal and could see water seeping from the thingy that the hoses connected to. After referring to our toilet’s user manual (ours came with the coach but you can find it online by looking up the manufacturer and model number), I learned that the “thingy” was actually the toilet’s vacuum breaker.
 Model and Serial Number
 Model and Serial Number
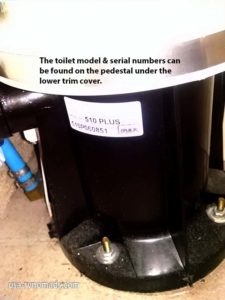
If you need to find the model and serial number of your toilet…its usually located on the lower section between the bowl and the floor flange.
Sourcing RV Toilet Repair Parts
I performed a quick online search yielding several sources where I could get the replacement part. I ended up sourcing the part from a local RV dealership and paid quite a bit more than I would have had I ordered it online. But we needed it NOW!
Now, one would expect that when you walk into a rather large RV dealership with a dedicated parts department you wouldn’t have too difficult of a time explaining what you were after, especially when you bring in pictures, part numbers and specifics of the toilet it’s for. However, after several minutes of looking in a paper catalog and on his computer, the clerk finally walked out to the service area and asked one of the “old timers” for help. Soon he returned with three different packages, all vacuum breakers of different types. “One of these should work,” he assured us.
I looked them over, matching what was in the package with what my picture showed. I found a match and then confirmed it was the right one by reading the back of the package which showed the very part number and model series of the toilet we were repairing. I was happy that I found the part, but not so happy with the price…oh well… it is what it is…when you need it NOW and you don’t want to spend a whole day driving from store to store, you have to make compromises.
How To Replace the Vacuum Breaker
Replacing the Vacuum Breaker is a pretty simple feat. First shut off the water (our rig has a water shut off valve to isolate the toilet from the supply line). From there, loosen the hose clamps that run from the foot pedal valve. They hold the water supply line. Also, if equipped, loosen the hose for the (optional) sprayer. With those loose, it is a matter of slipping the hoses off and then pulling the Vacuum Breaker out of the back of the toilet.
 However, these hoses in my rig had been in place for almost 12 years. They would not slide off. To solve this little dilemma, I pulled the vacuum breaker straight out of the back of the toilet with the hoses attached. This gave me extra surface to hold on to. Once removed, I picked up my trusty PEX/PVC cutter and cut the hoses as close as possible to the nipple ends on the vacuum breaker.
The rubber grommet that holds the Vacuum Breaker into the toilet was next to be pulled out. Simply stick your finger into the rubber grommet and pull it out of the toilet. Clean the opening in the toilet to make sure there is no calcification buildup. And BAM, you’re ready to install the new vacuum breaker!
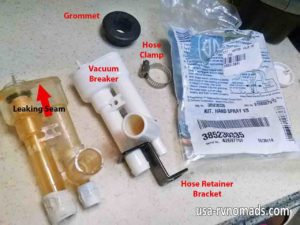 The replacement Vacuum Breaker came with hose clamps, hose retainer bracket and rubber grommet. You can reverse the process by inserting the new grommet into the toilet. As a tip from someone who’s done this before, use the new hose clamps and retainer bracket to reattach the hoses to the vacuum breaker before installing the vacuum breaker into the back of the toilet. Also, don’t tighten the clamps, just make them snug enough to keep them from slipping out of position. It makes the process MUCH easier.
Now push the vacuum breaker into the grommet located in the back of the toilet. Make sure the hoses aren’t twisted or binding. Tighten the hose clamps and turn the water back on.
You can function check your RV toilet repair job by flushing the toilet. If you have the optional sprayer, give it a test as well. Inspect for any leaking. If there isn’t any leakage, you did it right. Clean up and pat yourself on the back…job well done!