Since early July we’ve covered well over 4200 miles, going from Wisconsin to Nebraska to work a trade show, then to Ohio to work another event, and finally to Portland, Oregon where we worked our largest event yet. In between, we’ve called on lots of stores in our role of manufacturer’s representatives. We’ve set a dizzying pace, and have completely worn ourselves out a couple of times. But after a couple days rest, we’re always ready to get back in the thick of it. Our work is rewarding and whether crazy busy or not, this mobile lifestyle can’t be beat. Currently, Jerry and I are in the Seattle area, mixing work with pleasure and feeling very blessed to get to do what we do.
RV Battery Maintenance is a routine task that should be performed monthly by every full-time RVer. This usually involves opening the access door to the compartment where the batteries are stowed and sticking your head inside, opening the cell covers to check the water level inside each battery. Even on a bright sunny day or even if the compartment has a dome light inside, you’ll find it hard to see into the battery cell.
We’re just back from a fun, whirlwind vacation over the Memorial Day weekend in Chicago on a budget plan. I didn’t think it could be done, but with a little planning and a spirit of adventure, we pulled it off. What’s more, we’d do it again…and it has me wondering what other big cities we can explore on The Cheap.
The Challenge: Visit the major attractions in three days, no driving, a few meals out, and experience Chicago’s culture first hand.
You probably know that having a level RV is necessary for the proper operation of such appliances as your refrigerator. The refrigerator’s compressor needs to be level to properly process the ammonia or other refrigerant through the cooling system to keep your freezer frozen and your groceries cold.
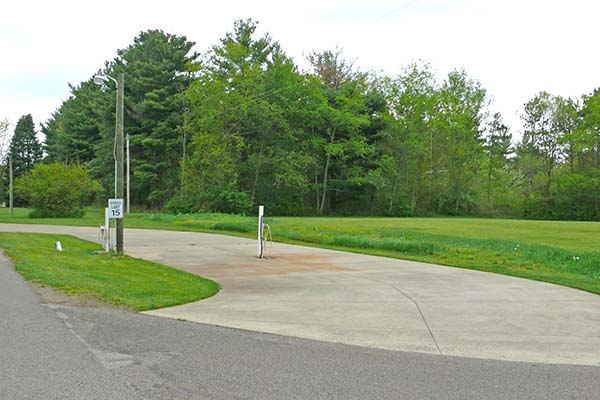
Two lanes reduce waiting time and they are fairly level too.
Although we try to stay at campgrounds and RV parks with full hookups, we often find ourselves at places that require one to trek to the dump station, get pumped out, or run back and forth with the tote to empty our holding tanks. We’ve seen some nice dump stations and some that…well, lets say they just aren’t conducive with getting everything out of one’s holding tanks.
But did you know that you really should also be level when you dump your holding tanks? Most never give it a thought but it could be the cause of some of the clogging issues many are seeking solutions for on the various forums and social media platforms.
Raising the right side and front was required here due to the slope of the parking lot.
Let me try to illustrate to you what happens when you dump your holding tanks without the rig being level.
If the drain side is too low, the solids in the tank could create a blockage that won’t allow the tank to empty completely. Hence you find the tank filling up faster than expected.
If the drain side is too high, the solids will settle to the farthest point from the drain, allowing only the liquids to run off and exit the tank. This leaves the waste solids to solidify and never evacuate the tank without some extraordinary measures to remove the crusty residue….the dreaded cone of crap.
Having a level RV means not only side to side, but front to back as well. It doesn’t take much of an angle to prevent the waste from properly and completely exiting through the dump valve and down into drain.
Ideally you want your rig as level as possible front to back and side to side to ensure all of the holding tanks contents remain suspended together and exit completely.
So you’re enjoying your trip when suddenly you experience a roadside emergency forcing you to pull onto the shoulder…a flat tire, engine overheating or anything that requires you to stop along the roadway. Turn on your EMERGENCY FLASHERS! If you’re towing a car turn on its Emergency Flashers too to increase your visibility!
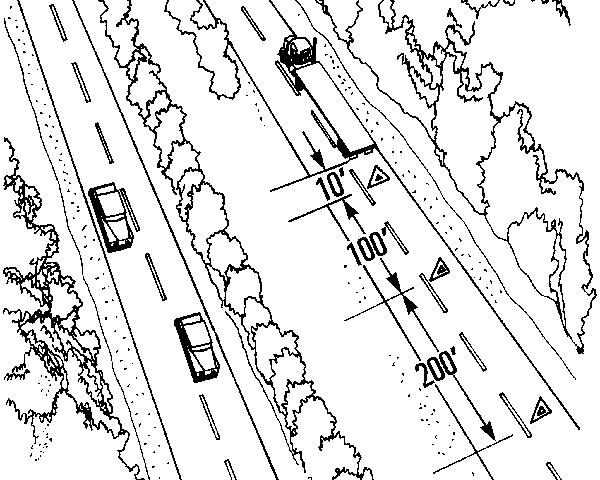
Assess the situation. If you’re stopped on the traveled portion or shoulder of a highway for any cause other than necessary traffic stops, you should, as soon as possible and at least within ten (10) minutes, place warning devices in the following manner:
A. One on the traffic side of and 4 paces (approximately 3 meters or 10 feet) from the stopped motor vehicle in the direction of approaching traffic;
B. One at 40 paces (approximately 30 meters or 100 feet) from the stopped motor vehicle in the center of the traffic lane or shoulder occupied by the commercial motor vehicle and in the direction of approaching traffic; and
C. One at 40 paces (approximately 60 meters or 200 feet) from the stopped motor vehicle in the center of the traffic lane or shoulder occupied by the motor vehicle and in the direction of approaching traffic.
Why are warning devices so important in a roadside emergency?
Why would you want to do this? To make your disabled rig as visible to approaching drivers as possible. Give them time to react and merge safely away from you and your vehicle. Watch some of the dash cam videos recorded by police and DOT of vehicles scrapping or slamming into a disabled vehicle along the road because they weren’t paying attention or weren’t in control of their vehicle.
If you don’t have a set of DOT Safety Triangles get a set. They’re not that expensive. You can find them at Walmart, an automotive supply store, truck stop or online. They may just save your life and a ticket. Even though you’re not driving a commercial vehicle, your RV is much larger than a typical passenger vehicle. Err on the side of safety and good sense…get the triangles, deploy them properly and be SAFE!
Find additional information as it applies to commercial vehicles on the Federal Motor Carrier Safety Administration website: